Unity Demo Pack
Overview
The “Leap Motion Demo Pack” is a helpful addition for developers using the Leap Motion Controller. This demo pack provides contextual examples that can act as both a starting point and a set of inspirational resources to envisage how Leap Motion interaction might be incorporated in your game. The scripts are written to be flexible to maximize functionality while creating a basic framework for how hands will interact with game objects.
Download the Leap Motion Demo Pack from the Unity Asset Store.
Six example scenes are included. Each demonstrates the core input functionality of the Leap Motion and how to utilize it within the Unity development environment.
Scenes included with the kit
- Weapons guns, grenades, and sword swiping! Throw a grenade, fire a machine gun, slice blocks with your sword!
- Flying example with immersive cityscape environment. Fly with both hands.
- Bowling physics simulation with rotational force based on your hand’s spin. Strike!
- Driving simulation using Unity wheel physics. Your hands control the rotation of the car’s steering wheel & throttle lever.
- Boxing punching bag setup with virtual gloves!
- ATV Driving grab onto the handles, accelerate, and brake. Toggle between first and third person camera’s.
*Requires the latest Leap Motion SDK to run.
Getting Started
First, set up the Leap Motion SDK to work within the Unity editor. See: Setting Up a Project.
Terminology
- Hand Controller - Assigns Leap hands to Unity Hands. Also holds Hand Settings for the Unity Hands.
- Unity Hand - Virtual hand game object that is either left or right hand. Holds the assigned Leap Motion SDK hand. This is the absolute position/rotation of hand and fingers in the Unity world. Detects fingers and uses finger detection to identify and assign fingers to finger game objects, these fingers are then parented to the Unity Hand.
- Hand Type - Responsible for handling displaying of the hands and hand collisions. Also responsible for holding and updating the current Leap Hand State. The Hand Type uses the Unity Hand to update its position/rotation but does not need to be at the same location as the Unity Hand.
- Rigged Hand - Uses Unity Hand finger information to rotate joints of a rigged hand model.
- Leap Game Object - Game objects that can be interacted with by Hand Type.
- Leap Hand State - The Leap input control state. Updates any currently held Leap Game Objects.
- Leap God Hand State - Default state that the Hand Type starts in. This state allows hands to appear in the world and to interact with Leap Game Objects.
Definitions
Hand Controller
The back-end controller is used to keep track of the Leap SDK Hands introduced into the view of the Leap Motion. It keeps track of and assigns the Leap Hands to the appropriate Unity Hands. The Hand Controller will determine whether a Leap Hand is a left or a right hand, then assign it to the corresponding Unity Hand. Also responsible for holding the settings for the Unity Hands.
Properties
Unity Hands - Holds the left and right Unity Hand game objects.
Hand Settings
- Highlight Objects - Defines whether hovered Leap Game Objects will be highlighted.
- Finger Distance Multiplier - Defines the distance of the fingers from the palm of the hand.
- Leap Position Multiplier - Multiplies the distance that the Unity Hands will be displaced from the Leap in the unity game world. Increase the value in X, Y, or Z World Space if the hands are not traveling far enough.
- Throwing Strength - Force multiplier for thrown objects.
- Angular Strength - Multiplier for angular momentum of thrown objects.
- Max Throwing Velocity - Maximum throwing velocity.
- Max Angular Throwing Velocity - Maximum Angular Throwing Velocity.
- Leap Position Offset - This holds the transform data for where the Leap should be in the game world so that the hands know where they should offset from (Should be the Leap Controller game object that is the parent to the Unity Hands).
Leap Position Offset
This is the transform that defines the location of each Unity Hand. Think of the Leap Position Offset as the actual Leap Motion device in the game world. The Unity Hands will offset according to the position and rotation from this transform offset.
Adjusting Leap Position
To adjust the Leap Position (mainly useful to lower/raise where hands are in the scene), simply adjust the Leap Position Offset object in the game world. Changing the position of the Unity Hands in the scene is irrelevant since the hands will be repositioned to wherever the Leap Position Offset object is in the scene.
Unity Hands
Absolute positioning of Leap hand and fingers translated into the Unity world. Uses finger detection to assign fingers to the corresponding finger game objects. The Leap SDK Hand object is stored in the Unity Hand. When a hand is introduced into the view of the Leap Motion, the hand will be assigned to a Unity Hand depending on whether it is a left or right hand. If the hand is undetermined to be a left or right hand, it’s isHandDetermined public variable will be false. Responsible for updating Hand Type.
Properties
- Initial Leap Object - The Leap Game Object that starts in the hand when the scene starts.
- Hand Type - Specify the Hand Type prefab that is associated with the Unity Hand. When the scene starts, the Hand Type will be instantiated and assigned to the corresponding Unity Hand.
- Is Right Hand - Check this if this hand should be the right hand.
Accessing Finger Information
The Unity Hand holds the game objects of the fingers in the game world, this information can be accessed to do specific things with the fingers. This information is stored in the list of Game Objects called ‘unityFingers’. For an example of this in use, refer to the LeapShootableObject script which uses the index finger to aim.
Hand Types
The Hand Types are game objects that are a bridge between the Unity Hand and the Leap Game Objects that are interacted with. It handles collisions with Leap Game Objects as well as displaying of the hand model. The Hand Type uses the Unity Hand to update its own position/rotation. The Hand Type is also used to store the current state of the hands as well as update the state and its associated Leap Game Objects. There are three default Unity Hand Types used for displaying the hand model in the world; HandTypeBasic, HandTypeMultiple, and HandTypeRigged. A hand type is attached to a Unity Hand and is instantiated when the scene starts.
Hand Type Basic
A hand type that has two game objects that represent the hand model; a hand/palm model and a finger model. The finger distance from the palm of the hand can be adjusted by adjusting the Finger Distance Multiplier value in the Leap Hand Controller.
Hand Type Multiple
A hand type that has multiple game objects to represent the different hand states the hand can be in. By default, there are three hand states; unknown, open, and closed.
Hand Type Rigged
A hand type that uses a rigged hand to display the hand. A rigged hand prefab needs to attach the Rigged Hand Transforms script and attach the joints of each finger to that script.
Leap Game Object
Base class for all game objects that can be interacted with by the Unity Hand Type. When a Leap Game Object is picked up, it switches the corresponding Hand Types’ Leap Hand State to be that of which is defined by the Leap Game Object. All objects that you can interact with using the Leap should be inherited from the Leap Game Object. The Leap Game Object is a way of indicating that the game object can be picked up when the Unity Hands Type is in the God Hand state. For example, when a Leap Game Object has a state of type LeapShootableState and is picked up, the Unity Hand Type that picks it up will change to the corresponding LeapShootableState in the Leap Hand States folder. Now when you make a shooting gesture with your fingers, bullets will be fired.
Properties
- Grab Center Offset - This is the transform data of a game object that specifies the position and orientation offset of the Leap Game Object.
- Is State Persistent - Specify whether corresponding Unity Hand Type can be exited from its current Leap Hand State.
- Drop On Lost - When hand is lost, determine whether object is released.
- Can Release - Specifies whether the held object can be dropped when in God Hand state.
- Can Go Through Geometry – If checked, when the Unity Hand Type interacts with the object, the object can go through geometry.
- Can Highlight - When Unity Hand Type collides with object, it is highlighted.
- Hand Is Visible – When Unity Hand interacts with object, determines whether hand is visible or not.
- Can Use Both Hands – If checked, object can be interacted with multiple hands.
- Highlight - Material used to highlight Leap Game Object.
Leap Basic Object
A basic object that can be picked up and dropped.
Leap Inactive Object
An object that cannot be picked up. Useful if you need an object that can be highlighted by the Unity Hand Type. This is used for the hand brake in the ATVDriving scene.
Leap Throwable Object
A Leap Basic Object that can be thrown rather than just dropped.
Leap Shootable Object
A Leap Game Object that can shoot projectiles when thumb is pressed to index finger. Use index finger to aim.
Leap Swingable Object
A Leap Game Object that collides with objects and creates a slashing effect when it moves fast enough.
Leap Hand State
Defines the controls and the way the Unity Hand Type interacts with Leap Game Objects in the world. The default Leap Hand State is the God Hand state.
Leap State
Base class for all Leap States.
God Hand State
The default Leap Hand state in which the Unity Hand Type interacts with Leap Game Objects by doing a grabbing motion with your hands above the Leap Motion. When you grab a Leap Game Object, the Unity Hand Type will switch states accordingly to the Leap Game Object’s defined Leap Hand State.
Leap No Hand State
A state that the hands go to when the hand leaves the view of the Leap Motion.
Step By Step Tutorials
Setting Up a Scene
- Start a new scene.
- In the “Prefabs/Leap Controller” folder place the “Leap Controller Multiple” prefab into the scene. Zero out the position and rotation transforms.
- Position the camera to be at the position: (0, 6, -10).
- Play scene. Unity Hand Types should move to the position of your hands above the Leap Motion.
Adding a Leap Game Object
- Add a cube under the Unity Hands at: Position: (0, 2, 0), Scale: (25, 1, 25)
- Rename the cube to “Floor”.
- Add a point light at position: (0, 5, 0).
- Add a cube at position: (0, 3.5, 0).
- Rename the cube to “Grabbable Cube”.
- Under the “Scripts/Leap Starter Kit/Leap Objects” folder, attach the LeapThrowableObject script to the Grabbable Cube.
- Play the scene. Move your hand over the cube and notice the cube changes colors. With the hands open over the Leap Motion, do a grabbing motion to grab the Grabbable Cube. Move the cube around and throw it by opening your hand back up so that the Leap Motion can see your fingers again.
- Congratulations! You should now have virtual hands interacting with object in Unity using the Leap Motion!
Making Unity Hands Move with the Camera
- Make the Leap Controller prefab in your scene a child of the Main Camera by dragging the Leap Controller prefab onto the Main Camera in the Hierarchy tab. Now when you move or rotate the camera, the hands will always stay in the same place locked to the camera.
- Play the scene. In the Scene view, move the camera around and notice the hands stay in place in regards to the camera.
Changing Unity Hand Types
- There are three default hand types; Basic, Multiple, and Rigged. In the “Prefabs/Leap Controller” folder, you can drag and drop one of the three types into your scene.
- To replace the Hand Type, in the “Prefabs/Hand Types” folder, find the Model Type you want. In the scene, under the Leap Controller, locate the left/right game objects and attach the preferred Model Type prefab to the Hand Type field in the Unity Hand script. This way, Hand Types can be easily switched without much effort.
Creating a Rigged Hand Type
- Instead of adding the “LeapControllerMultiple” prefab to a scene, add a “LeapControllerRigged” prefab.
- The default rigged hands will appear by default. To Replace the rigged hand with your own rigged hand, you will need to create a new Rigged Model Type.
- To create a new Rigged Model Type, first you will need to take your rigged hand model and attach the script ‘Rigged Hand Transforms’ to the parent object.
- In the Inspector, make the Joints size 5 and attach the transform of the base of rotation for each finger to each element in the list. The first finger in the list should be the left most finger for each hand (ex. Left hand is pinky and right hand is thumb). Save this as a prefab.
- You must then create a new game object with the ‘Hand Type Rigged’ script attached, in the ‘Rigged Hand Model’ field on the script, attach the newly created rigged hand prefab. Save this as a prefab.
- Once the Hand Type Rigged prefab is created, attach this prefab to the associated Unity Hand in the scene.
Note: When creating the rigged hand in a 3D modeling program, make sure the base of each finger is rotated so that each finger is pointing forward from the center of the world so that all its rotations are zero.
Adding a new Leap Hand State (Involves Scripting)
In the folder “Scripts/Leap Starter Kit/Leap Hand States”, create a new script and call it “LeapPointableState”.
Rename the class to LeapPointableState and have it inherit from LeapState.
Add the following code to the top of the class definition:
public LeapPointableState() { }
   public LeapPointableState(LeapGameObject obj)
   {
       activeObj = obj;
   }
   public override void Enter(HandTypeBase o)
   {
       handController = o;
       if (activeObj)
           handController.SetActiveObject(activeObj);
   }
   public override void Execute()
   {
       if (handController.unityHand == null)
           return;
       if (handController.activeObj)
       {
           // Update active object
           activeObj.UpdateTransform(handController);
           CheckEscape();
       }
   }
Now our state is defined so that we can enter the state and leave the state when the user presses Escape.
Adding a new Leap Game Object (Involves Scripting)
In the folder “Scripts/Leap Starter Kit/Leap Objects” create a new script and call it “LeapPointableObject”.
Rename the class to “LeapPointableObject” and have it inherit from “LeapBasicObject”.
At the top of the script, add the “using Leap;” statement since we will use the Leap extensions to reposition our Leap Game Object.
Add the following code to start the object in the LeapPointableState and to reposition the held object to point towards the index finger when held:
    public override LeapState Activate(HandTypeBase h)
    {
        base.Activate(h);
        return new LeapPointableState(this);
    }
    public override void UpdateTransform (HandTypeBase t)
    {
        base.UpdateTransform (t);
        UpdatePointTransform(t);
    }
    void UpdatePointTransform(HandTypeBase t)
    {
        Collider o = collider;
        Vector3 handOffset = new Vector3();
        Vector3 grabOffsetPos = new Vector3();
        bool fingerFound = false;
        // Uses Index Finger to aim
        if (owner.unityHand.unityFingers.ContainsKey(FINGERS.INDEX))
        {
            fingerFound = true;
        }
        o.transform.position = owner.transform.position + handOffset - grabOffsetPos;
        Vector3 tipPosition;
        if (fingerFound)
        {
            tipPosition =
            owner.unityHand.unityFingers[FINGERS.INDEX].transform.position;
        }
        else
        {
            tipPosition =
            owner.unityHand.hand.Fingers.Frontmost.TipPosition.ToUnityTranslated();
        }
        //Look at Finger
        o.transform.LookAt(tipPosition, owner.unityHand.transform.up); // Add finger rotation
    }
</pre>
Attach the LeapPointableObject script to a game object. Now, when the object is picked up, it’s orientation should change depending on where you are pointing with your index finger.
Getting Gestures to work and Accessing Leap SDK (Involves Scripting)
To get gestures to work you need to access the controller in the script, this is done through the LeapInputEX class. The following code checks to see if a Circular gesture was made in the last frame:
foreach (Gesture g in LeapInputEx.Controller.Frame().Gestures())
        {
            if (g.Type == Gesture.GestureType.TYPECIRCLE)
            {
                // Do Something
            }
        }
Starting a Unity Hand Type in a Leap Hand State
When a scene is started, the Unity Hand Type will default to the God Hand state. Sometimes you want to start the Unity Hand Type in a certain Leap Hand State when a scene is loaded. In order to do this, attach a Leap Game Object that has the Leap Hand State that you want to a Unity Hand in the public field in the Inspector labeled ‘Initial Leap Object’. Now when the scene is started the Unity Hand Type will start with the attached Leap Game Object and in the corresponding objects Leap Hand State.
Creating a Persistent Leap Hand State
Simply check the ‘Is State Persistent’ field in the inspector for the attached Leap Game Object. This is useful if you want to make a scene where the Unity Hand Type starts in a certain state and cannot leave that state. For instance, in the Boxing Scene, there are Unity Hands that start with a corresponding attached LeapGameObject that are boxing gloves and have the ‘Is State Persistent’ checked and the ‘Drop On Lost’ field unchecked, this quickly and easily creates a simple boxing game where the gloves are always attached to the hands.
Scene Breakdown
Bowling Scene: Throwing the Bowling Ball
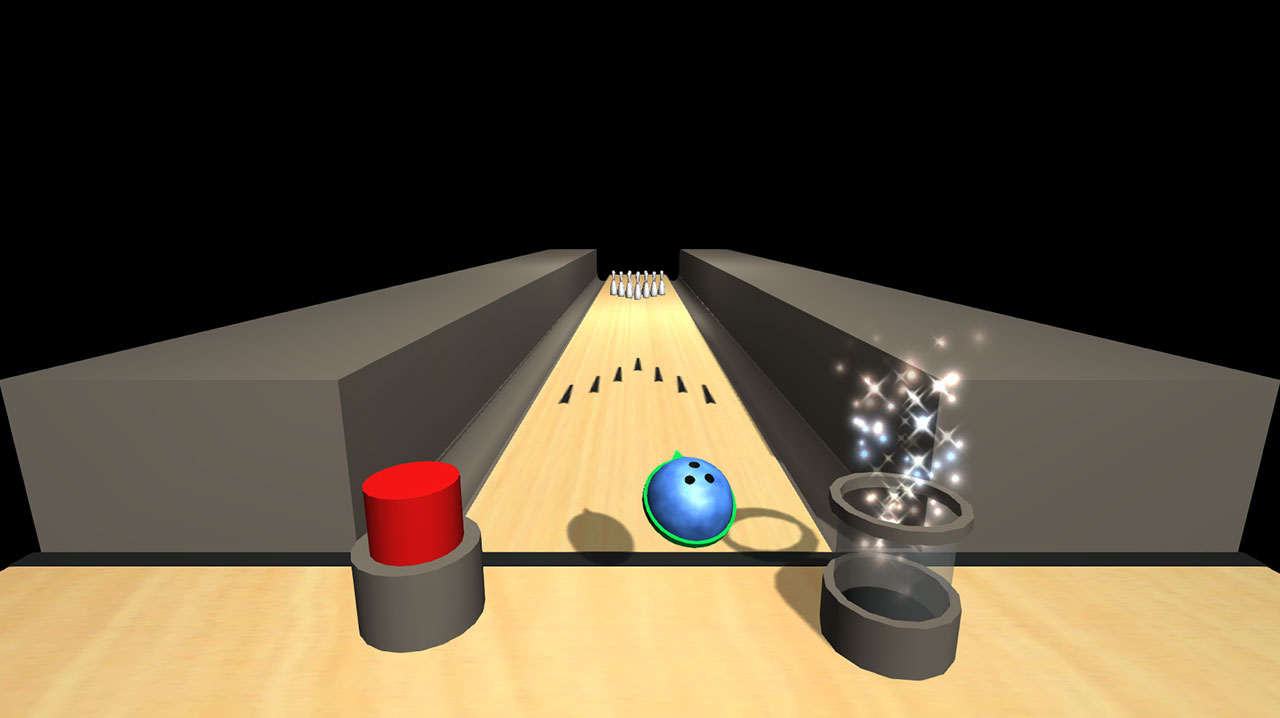
- Grab the bowling ball with your right hand.
- Line up your hand with the pins and throw / open your hand up while moving your hand forwards towards the pins. When releasing , make sure your palm is facing down towards the Leap Motion. Note: Make sure to open your hand when throwing so the Leap Motion can see your fingers. The Leap Motion needs to know that your hand is now open.
- To reset the scene, use your left hand and hover over the big red button. Push the button down with your hand.
Boxing Scene
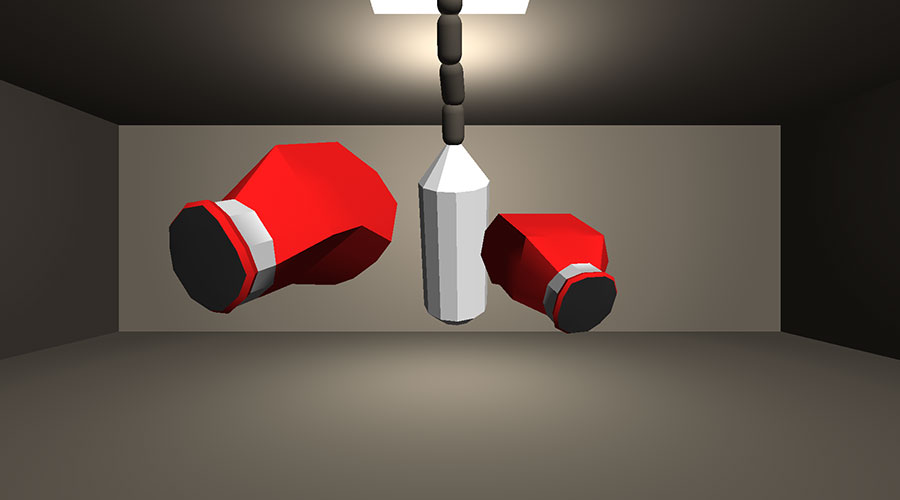
- Have your hands either open or closed and make a forward punching motion with your hands at the punching bag.
**Note: Be careful not to punch any real world objects while immersed in the scene.
Flying Scene: Learning to fly
- With both hands in the view of the Leap Motion and fingers extended, tilt your hands up and down to fly up/down.
- Move left hand back/forward and right hand forward/back to steer left/right.
- Move left hand down/up and right hand up/down to bank left/right.
- To reverse, put fingers together so that the Leap Motion no longer sees your fingers.
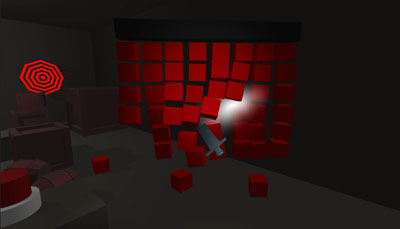
Objects and Weapons Scene: Pick up and throw Grenade
- Hover your hand over the grenade, when your hand is colliding with the grenade, do a grabbing motion with your hand, the grenade should now move with your hand.
- After picking up the grenade, you have three seconds to throw it. Throw the grenade by moving your hand forward and opening your hand so that the Leap Motion can see your fingers again.
Objects and Weapons Scene: Pick up and Aim Flashlight
- Hover your hand over the object and pick it with a grabbing motion.
- To aim with the flashlight, open your hand up with the fingers extended. The object will not drop. The object will rotate with your hands rotation in the direction of your palms forward direction.
- To drop the flashlight, either have your hand leave the view of the Leap Motion, or press Escape to return to GodHand mode.
Objects and Weapons Scene: Pick up, Aim and Fire Guns
- Hover your hand over the weapon and pick it up by making a grabbing motion.
- To aim, have only your thumb and index finger exposed to the Leap Motion.
- Move your index finger and hand to aim.
- While aiming, move your thumb to touch your hand so that the Leap Motion no longer detects your thumb. Projectiles will now be shot as long as only the index finger is detected by the Leap Motion.
- To stop shooting, move the thumb away from the hand so it is no longer touching the hand and can be seen by the Leap Motion.
- To drop the held object, either have your hand leave the view of the Leap Motion, or press Escape to return to GodHand mode.
Objects and Weapons Scene: Pick up and Aim Swingable Weapons
- Hover your hand over the weapon and pick it up by doing a grabbing motion.
- To move, have your hand open and move it around as if your hand is a sword.
- To do a sword swipe, move your hand quickly from one point to another as if doing a sword swipe with your hand.
- To drop the held object, either have your hand leave the view of the Leap Motion, or press Escape to return to GodHand mode.
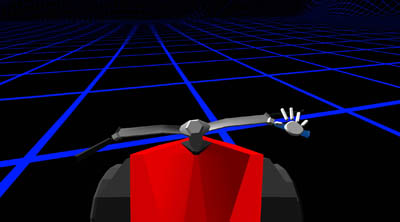
Driving Scene: Driving and Accelerating
- Use your left hand to grab the throttle to accelerate/decelerate.
- Use left or right hand (or both) to grab onto the steering wheel to steer the car while the car is moving.
ATV Driving
- The main controls of accelerating and braking is controlled by grabbing onto the right handle of the vehicle. The left handle only controls steering direction.
- To accelerate, while grabbing the right handle, rotate your wrist up. Note: Make sure you are not holding onto the break.
- To slow down, rotate your wrist down as if you are controlling a real ATV.
- To brake, open your right hand, while the hand is still on the handle, make sure the hand is colliding with the brake (if it is colliding, it should highlight). With the brake selected, make a grabbing motion and the brake should be grabbed. To release the brake, open your hand and grab onto the handle without grabbing the brake.
- Press ‘C’ to toggle between first and third person camera.
We hope you find this information helpful and look forward to seeing your Unity apps in Airspace!