
 Installer, SDK & Release Notes
 JavaScript
 Unity / C#
 Unreal Engine 4
 VR Getting Started
 C++
C++Installer & SDK Getting Started
-
Download, extract and run the installer.

-
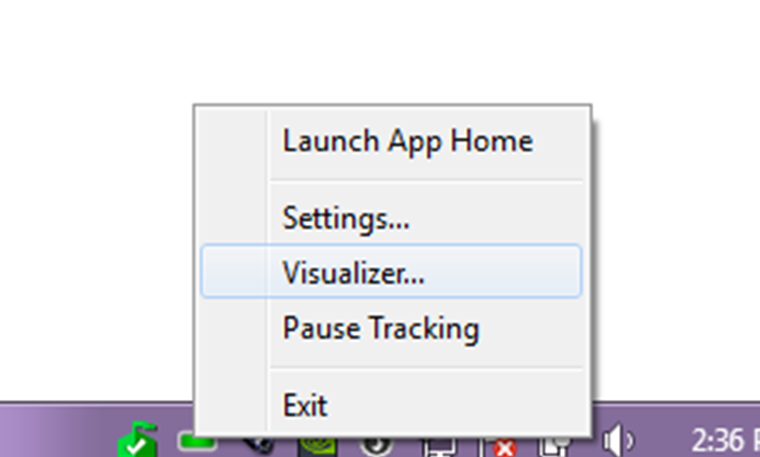
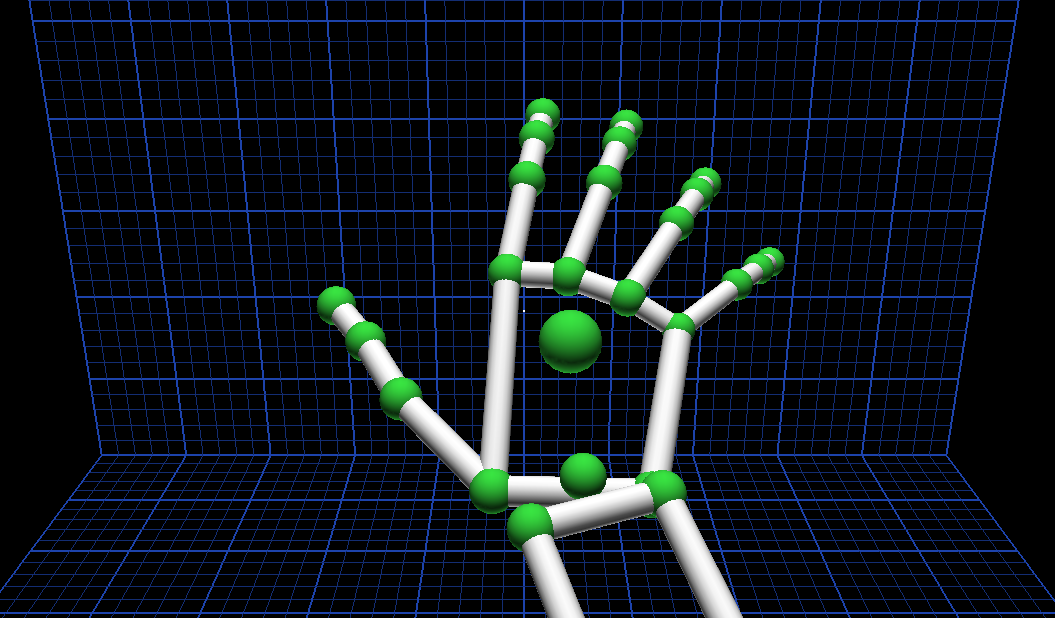
After installation, connect your Leap Motion Controller and open the Visualizer.
-
Choose your development environment for more detailed tutorials.


JavaScript Getting Started

- Use the Video Tutorial & Example to print data from the Leap Device.
- Follow the guide below to build your first app.
-
Visit the downloads page for libraries, plugins, and tools.
Working in VR? First check out the JavaScript VR examples and then get the lay of the land with our quickstart guide.
Frames
LeapJS works by connecting to a websocket server running locally through the Leap Service. As often as every 10ms, the
service sends a frame over the websocket and to the open page. This frame is a blob of JSON data including the
positions of hands and fingers.
The browser only repaints the page every 16ms (60Hz) at best, and so these deviceFrames are not used directly.
Instead, a LeapJS controller generates animation frames based off of the browser's
"animation loop". (Using Node?
Read up on the Javascript Frame Detection Loop)
The easiest way to access frame data is with the Leap Loop.
<div id=output></div>
<script>
  var output = document.getElementById('output');
  Leap.loop(function (frame) {
    output.innerHTML = 'Frame: ' + frame.id;
  });
</script>
ProTip™ — Although we're big fans of console.log here at Leap, it's actually not recomended
while printing out frame data, as that can flood your console pretty quickly. For relaxing times, try instead setting
the contents of an element on the page. You don't event need to quote your attributes.
Frame Objects
Every frame contains a lot of stuff, but the basic structure of what's needed most of the time is pretty simple. Here's the essence of a frame:
// Don't copy-paste this, it's not actually code.
LeapFrame = {
  hands: [
    {
      palmPosition: [x,y,z]
      palmNormal: [x,y,z]
      direction: [x,y,z]
      roll()
      pitch()
      yaw()
      pinchStrength: 0-1
      grabStrength:  0-1
      fingers: [
        {
          tipPosition: [x,y,z]
          direction: [x,y,z]
          bones: [
            {
              prevJoint: [x,y,z]
              nextJoint: [x,y,z]
              length: mm
              width:  mm
              center()
              matrix()
            }
          ]
        }
      ]
    }
  ]
}
Fingers and bones can be accessed through their names - thumb through pinky, and
carpal, proximal, medial, and distal.
There actually a lot more that is available, such as length, speed, timeVisible, rotationMatrix, and so on. Check out the docs on Hand and Pointable for the details.
Here's an image that will be useful later. Maybe you should even save it to disk now.

Example
Enough talk! Let's write an app that moves cat based on how you move your hand. We want it to move left/right and up/down on the screen as your hand moves above the Leap, and to tilt when your hand tilts.
Here's how we'll break it down:
- An HTML image tag for the cat
- CSS absolute positioning to place the cat on the screen
- CSS Transforms to rotate the cat
- Leap
screenPositionplugin to know where it should be placed - Leap
hand.roll()to tilt the cat.
Architecture
<script src="//js.leapmotion.com/leap-0.6.4.js"></script>
<script src="//js.leapmotion.com/leap-plugins-0.1.11.js"></script>
This lays out the structure of our application. We start with the `cats` data-store, a humble javascript object.
var cats = {};
Next we set up the loop. On every frame, look at every hand using the native javascript forEach method,
and position the cat accordingly. setTransform() is stubbed out with no arguments, until we know what we
need.
Leap.loop(function(frame) {
  frame.hands.forEach(function(hand, index) {
    var cat = ( cats[index] || (cats[index] = new Cat()) );
    cat.setTransform(...);
  });
})
We set up our Cat class, which will handle the DOM elements & interactions.
var Cat = function() {
  var cat = this;
  var img = document.createElement('img');
  img.src = 'https://s3-us-west-2.amazonaws.com/s.cdpn.io/109794/cat_2.png';
  img.style.position = 'absolute';
  img.onload = function () {
    document.body.appendChild(img);
  }
  cat.setTransform = function() {
    // todo
  };
};
Finally, we'll be using a LeapJS plugin to handle the conversion from coordinates in the real world to a position on the screen. Plugins run one after another before the frame is given to your application, allowing them to augment the frame with additional data before it gets used.
Manipulation
ProTip™ — Manipulate, noun: "to move or control something with your hands".
The screenPosition() plugin returns an array of numbers [x,y,z] of where the hand is on-screen in pixels. It does this by taking hands `palmPosition`, given in mm relative to the Leap Device, multiplying by a constant `scale` factor, and adding a constant `verticalOffset`.
In order for this to be available on the hand object, we have to tell the loop to use plugin. We do that by calling
use, and passing in a custom scale factor.
roll() describes the motion your hand makes while turning a doorknob. It returns a number in radians
from your palm facing downwards. Following the
right-hand-rule with the z-axis coming towards us, we know
that it is positive in the counter-clockwise direction.
Leap.loop(function(frame) {
  frame.hands.forEach(function(hand, index) {
    var cat = ( cats[index] || (cats[index] = new Cat()) );
    cat.setTransform(hand.screenPosition(), hand.roll());
  });
}).use('screenPosition', {scale: 0.25});
On the CSS side of things. We look at the first two values of the position array, x and y; and use them to position the image. We're careful to subtract the image dimensions, so that it stays on-center.
CSS transforms make quick work of the rotation value; and we take care to keep things cross-browser compatible. (css3please.com can help).
cat.setTransform = function(position, rotation) {
  img.style.left = position[0] - img.width  / 2 + 'px';
  img.style.top  = position[1] - img.height / 2 + 'px';
  img.style.transform = 'rotate(' + -rotation + 'rad)';
  img.style.webkitTransform = img.style.MozTransform = img.style.msTransform =
  img.style.OTransform = img.style.transform;
};
That's almost it! Let's add a little shim so that the cat shows up even without the Leap.
// inside the Cat definition:
  img.onload = function () {
    cat.setTransform(
      [
        window.innerWidth/2,
        window.innerHeight/2
      ],
      0 );
    document.body.appendChild(img);
  }
// At the tail-end of the script
cats[0] = new Cat();
Putting it all together
var cats = {};
Leap.loop(function(frame) {
  frame.hands.forEach(function(hand, index) {
    var cat = ( cats[index] || (cats[index] = new Cat()) );
    cat.setTransform(hand.screenPosition(), hand.roll());
  });
}).use('screenPosition', {scale: 0.25});
var Cat = function() {
  var cat = this;
  var img = document.createElement('img');
  img.src = 'https://s3-us-west-2.amazonaws.com/s.cdpn.io/109794/cat_2.png';
  img.style.position = 'absolute';
  img.onload = function () {
    cat.setTransform([window.innerWidth/2,window.innerHeight/2], 0);
    document.body.appendChild(img);
  }
  cat.setTransform = function(position, rotation) {
    img.style.left = position[0] - img.width  / 2 + 'px';
    img.style.top  = position[1] - img.height / 2 + 'px';
    img.style.transform = 'rotate(' + -rotation + 'rad)';
    img.style.webkitTransform = img.style.MozTransform = img.style.msTransform =
    img.style.OTransform = img.style.transform;
  };
};
cats[0] = new Cat();
Next Steps
At this point, you know how to make fully-qualified a Leap app. But there are plenty of bells and whistles to keep you going.
Controllers
You should know that under the hood, Leap.loop is running a controller. Any time you need to, a
controller can be set up and used without the loop. Remember to call connect().
var controller = new Leap.Controller({enableGestures: true})
  .use('screenPosition')
  .connect()
  .on('frame', function(frame){
    // Try making some circles
  })
Backgrounding
You may notice that at the bottom of the codepen example itself, there is an extra line. By default, LeapJS stops animating when a windows is out of focus, in order to save CPU usage. This functionality can be easily disabled:
controller.setBackground(true);Further Resources
We love to hear from you! Visit the community forums for help or to share your work, or visit the issue tracker on GitHub if you've got feedback on the library itself.

Unity / C# Getting Started
Want to build a 3D interactive experience? Unity is a game development engine that integrates seamlessly with Leap Motion control. We’ve designed assets for Unity 5, including rigged hands, demo scenes, and resources for VR.
1. Download and install Unity 5. (Deprecated assets for Unity 4.6 Free and Pro are also available on our Unity 4.6 downloads page. Additional setup instructions below.)
2. Visit our downloads page to get our Unity Core Assets package.
3. Go to the Leap Motion Control Panel in the taskbar and check Allow Images. This allows your project to access the infrared video passthrough for VR/AR. (See example.)
4. Dig into the setup instructions below! This guide features:
- Setting up the Core Assets
- Setting up a basic scene
- Creating a simple game
- Using Leap Motion and Oculus for VR
- Using the deprecated Unity 4.6 assets
Setting Up the Core Assets
- Ensure that you have the appropriate version of the Leap Motion software installed for your Asset package. Supported versions are indicated on the downloads page.
- In Unity, go to File and click New Project…
- Name your project and click Create Project.
- Right-click in the Assets window, go to Import Package and click Custom Package…
- Find the Core Unity package and import it.
- From there, you’ll see two folders in the Assets window – the Plugins folder, which contains all of our API bindings, and the LeapMotion folder, which contains all of our Prefabs, Scripts, and Scenes.
Setting up a Basic Scene
- Once you’ve set up the Core Assets (see above), go to LeapMotion/Prefabs in the Asset window.
- Drag and drop HandController into the scene, and it will create a virtual Leap Motion Controller in the scene.
- In the Transform section, set the position of the controller to X = ‘0’, Y = ‘-3’, and Z = ‘-3’
- You can then add a directional light (from the Create menu on the upper left) to illuminate the hands.
- You can also add objects into the scene and put them near the controller. To interact with the objects, click on the Cube, then Add Component, and add Rigidbody. Be sure to disable gravity so that the object doesn’t fall away (you’ll see this in the Rigidbody properties.)
Creating a Simple Game
- Once you’ve set up the Core Assets (see above), go to LeapMotion/Prefabs in the Asset window.
- In the Additional folder, drag the HandControllerSandbox Prefab into the scene. This will create a virtual room with boundaries that reflect the Leap Motion Controller’s tracking limits.
- In the Transform section, set the position of the room to X = ‘0’, Y = ‘-3.5’, and Z = ‘-3’. You’ll be able to see the HandController Prefab underneath the room.
- When you play the scene, your hands will appear in the room.
- You can also add objects into the scene and put them near the controller. To interact with the objects, click on the Cube, then Add Component, and add Rigidbody. (It’s OK to have gravity with this one!)
Using Leap Motion and Oculus for VR
Want to build a 3D interactive experience with the VR Developer Mount? Our Core Assets for Unity 5 let you access and use raw infrared imagery, as well as allow users to access desktop and VR modes.
In the Core Assets package you also find the following examples:
- LeapOculus500Blocks. A basic sandbox demo featuring 500 floating blocks and image passthrough.
- LeapOculusHandViewer. See all the available hands that we've designed for VR by pressing the left/right keys.
- LeapOculusPassthrough. Another passthrough demo with a wall of blocks that you can punch through.
- LeapOculusMovingDemo. Move forward in the scene by facing both palms outwards with fingers towards the sky.
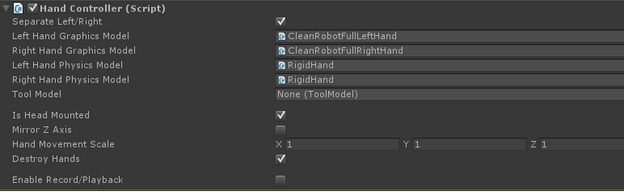
Note: Always make sure that you're running the appropriate versions of the Oculus and Leap Motion SDKs! Supported versions are indicated on the downloads page in the known issues for Unity Asset releases. With VR, you’ll need to make sure that “Is Head Mounted” is enabled in the Hand Controller script (below). To access infrared video passthrough, make sure that Allow Images is checked in the Leap Motion Control Panel, available from the taskbar icon.
Using the Deprecated Unity 4.6 Assets
While our assets for Unity 4.6 are no longer being actively supported, we’re keeping them available for developers. You can download the Unity 4.6 asset packages from our Unity 4.6 downloads page. But first, here’s what you need to know:
Unity Pro: The setup instructions are the same as those noted above in Setting Up the Core Assets. The VR assets have been confirmed to work on Unity 4.6.1.
Unity Pro + VR: See the Unity 4.6 downloads page for more information about setting up the VR assets for Unity Pro.
Unity Free: Simply unzip the Unity Free assets available from the downloads page into your project folder. When you create an executable, be sure to copy all library files in the asset (DLL in Windows) to the executable's root folder. This is necessary because Unity Standard does not support moving third-party plugins. To build examples with Unity Free, check out this quick setup guide. Note that this may only be effective for examples developed with Unity 4.6.1 or below.
Unity Free + VR: Note that the VR assets will only work in the Windows version of Unity Free. See the Unity 4.6 downloads page. for more information about setting up the VR assets.